
FlightLog Analyzer
User Guide
A companion app for Microsoft Flight Simulator 2020 and 2024
Contents
Quick Start Guide................................................................................. 7
System Requirements.......................................................................... 8
Flight Simulator 2024 Support.............................................................. 8
Locating and Loading the Logbook...................................................... 8
Choose Logbook File(s).................................................................... 8
Picking the correct logbook file for each version.......................... 9
Logbook Locator (Non-Standard Installations)................................. 9
Manually Load Logbook.................................................................... 9
The Main Display.................................................................................. 9
Highlighted Cells and Rows............................................................ 10
Logbook Utilization......................................................................... 11
Dark Mode....................................................................................... 12
Display Modifiers............................................................................. 12
Date and Time Formatting.......................................................... 12
Column Customization................................................................ 12
Lost-Flight Protection.......................................................................... 12
How Recovered Flights Are Displayed........................................... 13
Importing Lost Flights..................................................................... 13
Manual Entry Form...................................................................... 13
CSV Import.................................................................................. 13
Importing X-Plane Flights............................................................... 13
Decoding the X-Plane "Aircraft Name" Field.............................. 14
SimConnect Telemetry....................................................................... 14
Truncated Telemetry....................................................................... 15
Cleaning the Telemetry Data.......................................................... 15
Deleting Flights............................................................................... 15
Charts and Graphs Panel................................................................... 15
ATC View — Real-Time Flight Map................................................... 16
Aircraft Position and Flight Path..................................................... 17
Color-By Modes........................................................................... 17
The HUD......................................................................................... 18
The Altitude Profile Section............................................................ 18
Mouse Hover on the Profile........................................................ 18
Map Overlays — Aviation Charts................................................... 18
Destination Lines............................................................................ 19
Waypoint Sequencer...................................................................... 21
Automatic Destination Detection.................................................... 21
Other Controls................................................................................. 22
Zoom to Fit (F5)........................................................................... 22
Auto-Center (F4)......................................................................... 22
Destination Lines (F6)................................................................. 22
Clear Current Flight Tracks......................................................... 22
Mission Debrief — Historical Flight Replay........................................ 22
HUD Replay Mode.......................................................................... 23
Waypoints in Replay....................................................................... 24
Map Overlays and Color-By Modes............................................... 24
Profile Scrubbing............................................................................. 25
Multiple Debrief Windows............................................................... 25
Flight Map and Flight Profile for Historical Flights............................. 25
Flight Map....................................................................................... 25
Built-In Viewer............................................................................. 25
Google Earth Pro........................................................................ 27
Basic Use........................................................................................ 29
Type and Return............................................................................. 30
Partial Matches............................................................................ 30
Excluding Instead of Including........................................................ 30
Clearing Individual Filters............................................................... 30
Group Analysis and Summarizing...................................................... 31
Drilling Into a Group........................................................................ 31
FlightLog Exporter.............................................................................. 32
Export Format................................................................................. 32
Export Content................................................................................ 32
Flight Numbers................................................................................ 33
User Preferences................................................................................ 33
Logbook Cleaner................................................................................ 34
Choosing Which Flights to Delete.................................................. 35
Restore Points................................................................................ 36
Which Flights Are Eligible............................................................... 37
Choosing Which Flights to Correct................................................. 38
Restore Points................................................................................ 38
Achievements Progress Tracker........................................................ 38
Logging In....................................................................................... 38
Steam Installations......................................................................... 39
FS2024 Achievements.................................................................... 39
Further Reading.............................................................................. 39
Aircraft-Model Name Translation....................................................... 39
Example 1: Consolidating Variants................................................ 40
Example 2: Replacing the Manufacturer Too................................. 40
Example 3: Wildcards..................................................................... 40
Example 4: Regular Expressions................................................... 40
Auto-Archive and Manual Backups.................................................... 41
FlightLog Auto-Archive................................................................... 41
Manual Backups............................................................................. 41
Hot-Key Quick Access........................................................................ 42
Custom Colors.................................................................................... 43
Command-Line Interface (CLI)........................................................... 43
Running FlightLog Analyzer on Linux................................................ 43
Step 1: Install Lutris........................................................................ 43
Step 2: Install FlightLog Analyzer................................................... 43
Step 3: Create a Symbolic Link to Your Logbook.......................... 44
Step 4: Load the Logbook............................................................... 44
Instrument Approach Suffixes........................................................ 44
Troubleshooting.................................................................................. 45
Reverting to an Older Version of FlightLog Analyzer..................... 45
Reverting to a Logbook Backup..................................................... 45
Built-In Map Display Not Showing Satellite Overlay Correctly....... 45
Finding Your Logbook in a Non-Standard FS Installation.............. 45
The Program Crashes at Startup.................................................... 45
Automatically Send Logbook to Support.................................... 46
Manually Locating Your Logbook — Method 1........................... 46
Manually Locating Your Logbook — Method 2........................... 46
LNM (Little Navmap) Export Notes................................................. 46
SimToolKitPro Exports.................................................................... 47
Volanta Exports............................................................................... 47
Sky Dolly Export and Import........................................................... 47
Missing SIDs, STARs, or Approach Information............................ 48
Missing Airport Name, City, or State.............................................. 48
Viewing an Altitude Profile in Google Earth................................... 48
Reinstating "Show Again" Dialogs.................................................. 48
Contact Information............................................................................ 49
Registration / Licensing...................................................................... 49
Thank You for Supporting FlightLog Analyzer................................... 49
Introduction
FlightLog Analyzer is a companion app for Microsoft Flight Simulator 2020 and 2024. It picks up where the in-game logbook leaves off — turning a flat list of flights into a searchable, sortable, filterable record of your time in the sim, with rich tools for visualizing where you flew and how.
Headline features include:
• Consolidated display of flights from FS2020, FS2024, or both at once
• Tabular logbook view with column customization, dark mode, and grid lines
• Filtering and grouping across virtually any flight attribute
• Flight path maps with smoothed and high-resolution telemetry tracks
• Altitude profiles charting climb, descent, speed, and elevation
• A real-time moving-map ATC View with HUD, IFR/VFR chart overlays, and waypoint navigation
• Mission Debrief — a full replay of any historical flight that recorded SimConnect telemetry
• Achievements tracker pulled live from your Xbox/Microsoft account
• Export to .CSV, .XML, .KML, Little Navmap, Volanta, SimToolKitPro, and Sky Dolly
FlightLog Analyzer also includes editing tools that act directly on Flight Simulator's logbook:
• Permanently remove unwanted flights with the Logbook Cleaner
• Restore missing takeoffs and landings with the Flight Fixer
• Automatic backups and restore points before every edit
Quick Start Guide
If you just want to see what FlightLog Analyzer is all about, here's the short version:
1. Launch FlightLog Analyzer.
2. Let it scan for existing logbooks on your computer and confirm the selection.
3. All flights from the loaded logbooks appear in the main table — FS2020 and FS2024 are merged into a single list.
4. Click any column header to sort. Drag column headers to reorder. Right-click headers to hide columns.
5. Right-click any flight to see options: view the Flight Map, the Flight Profile, export, delete, fix missing takeoffs/landings, and more.
6. Install a KML viewer if you want 3D maps — Google Earth Pro is recommended.
7. Click the Flight Group Analysis button to summarize your logbook by aircraft type, weather, year, or any other attribute.
8. Explore the Preferences menu to tailor the app to your workflow.
|
Tip: Tooltips are your friend. Hover over almost any button, label, or column header to see what it does. |
System Requirements
Microsoft Flight Simulator 2020 or 2024 must be installed on the same computer.
Beyond that, FlightLog Analyzer has no special hardware requirements. If Flight Simulator runs on your system, FlightLog Analyzer will too.
Initial Installation
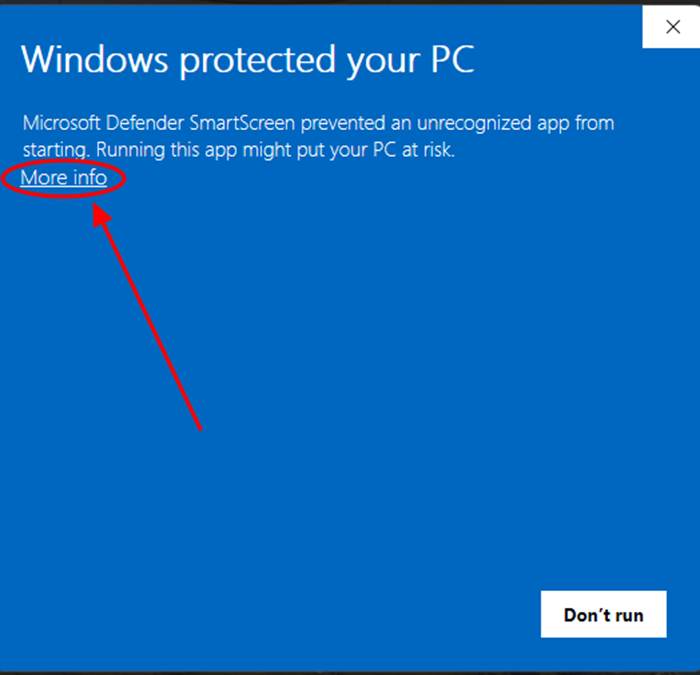
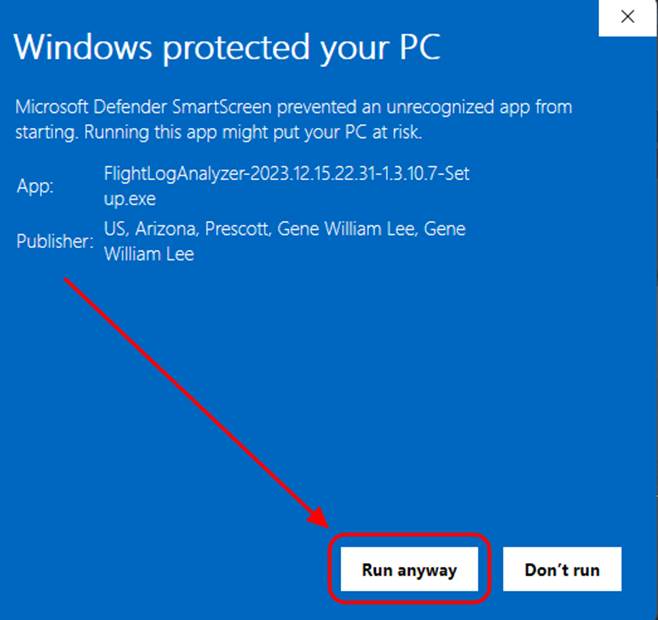
When you run setup.exe, Windows Defender may show a "Windows protected your PC" screen. This is not a virus warning — it appears for any executable that doesn't have widespread distribution history.
To proceed:
1. Click More Info.
2. Confirm the publisher shown on the next screen.
3. Click Run Anyway to continue the installation.
Flight Simulator 2024 Support
FlightLog Analyzer is fully compatible with Flight Simulator 2024. You can load one or both logbooks — FS2020, FS2024, or both at once — and all flights are merged into a single consolidated view.
When both are loaded, every operation (filtering, grouping, exporting, editing) works across both logbooks. Edits made through the Logbook Cleaner or Flight Fixer are applied to the correct file automatically.
|
Note: Flights are merged inside FlightLog Analyzer only — FS2020 continues to see only FS2020 flights, and FS2024 continues to see only FS2024 flights. The two sims are not aware of each other. |
To prevent you from losing flight history when you eventually uninstall FS2020, FlightLog Analyzer keeps an archived copy of every loaded logbook (see FlightLog Auto-Archive later in this guide).
Locating and Loading the Logbook
FlightLog Analyzer offers three ways to find and load your logbooks, all under the File menu.
Choose Logbook File(s)
This is the default method and runs automatically the first time you launch the app. It performs a quick search in the standard installation directories for both FS2020 and FS2024 logbooks, then asks you to confirm which file belongs to which version.
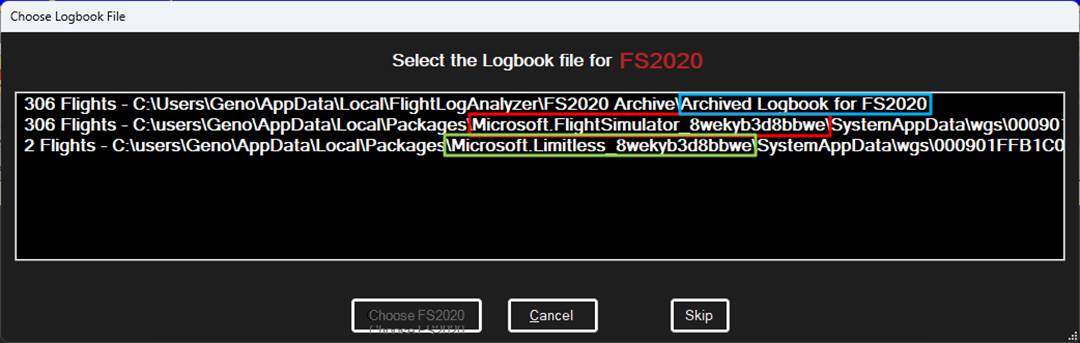
Logbook selection dialog
Picking the correct logbook file for each version
When the scan completes, the results dialog appears. Use these clues to assign each file to the correct sim version:
• FS2020 (active) — the path typically contains the folder Microsoft.FlightSimulator_8wekyb3d8bbwe (highlighted in red in the dialog).
• FS2024 (active) — the path typically contains the folder Microsoft.Limitless_8wekyb3d8bbwe (highlighted in green).
• FS2020 (archived) — a previously saved copy of your FS2020 logbook, shown in blue. After you uninstall FS2020, this is the file you'll want to load to preserve your FS2020 flight history.
If you mis-identify a file, the only effect is that the FS Version column will display the wrong value. Run File → Choose Logbook File(s) again to correct it.
Logbook Locator (Non-Standard Installations)
If you installed Flight Simulator into a non-default directory, the auto-scan won't find your logbook. Use this option to specify a starting folder and drill down from there. See the Troubleshooting section for tips on speeding up this search.
Manually Load Logbook
If you know exactly where your logbook is — or want to load a specific archived copy — use this option. It loads one logbook at a time and asks you to confirm which sim version it belongs to.
The Main Display
The Main Display is the heart of FlightLog Analyzer — every flight from your loaded logbooks appears here as one row in the table.
At startup, FlightLog Analyzer automatically locates Flight Simulator's logbook(s) and extracts the data for every flight. When both FS2020 and FS2024 are loaded, their flights are consolidated into a single view.
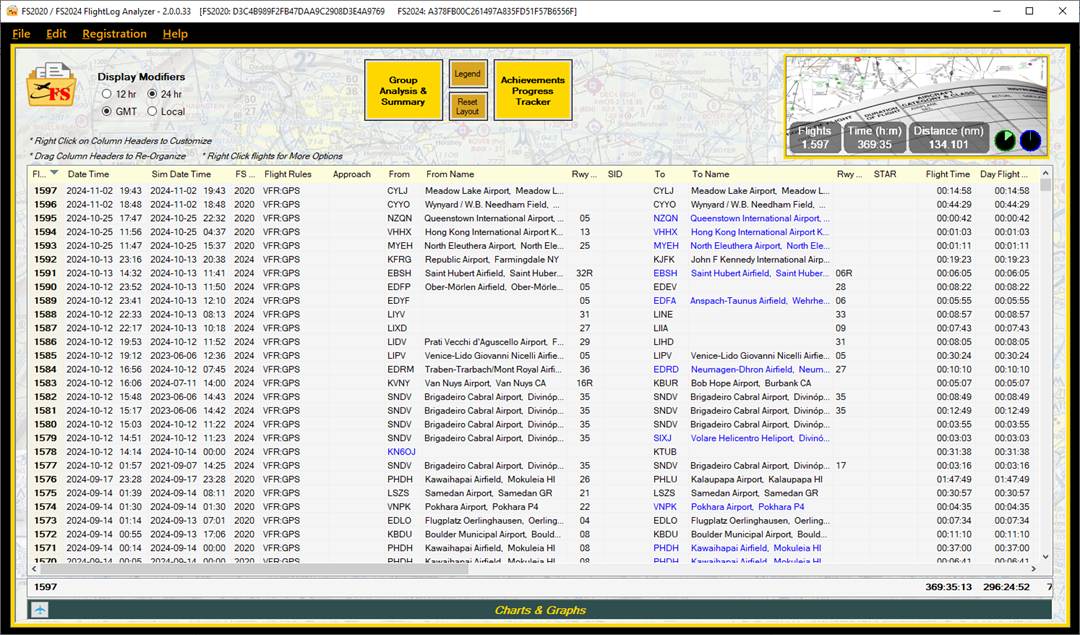
Main Display with 2020 + 2024 consolidated flights
If you make new flights in the sim while FlightLog Analyzer is open, the logbook reloads automatically. You can also force a refresh from File → Refresh Display, or by pressing F5.
Hover over any column header to see a tooltip describing what that column shows.
|
Note: If the main display is empty, the logbook file likely couldn't be found at its default location — see Logbook Locator for Non-Standard FS Installations in the Troubleshooting section. |
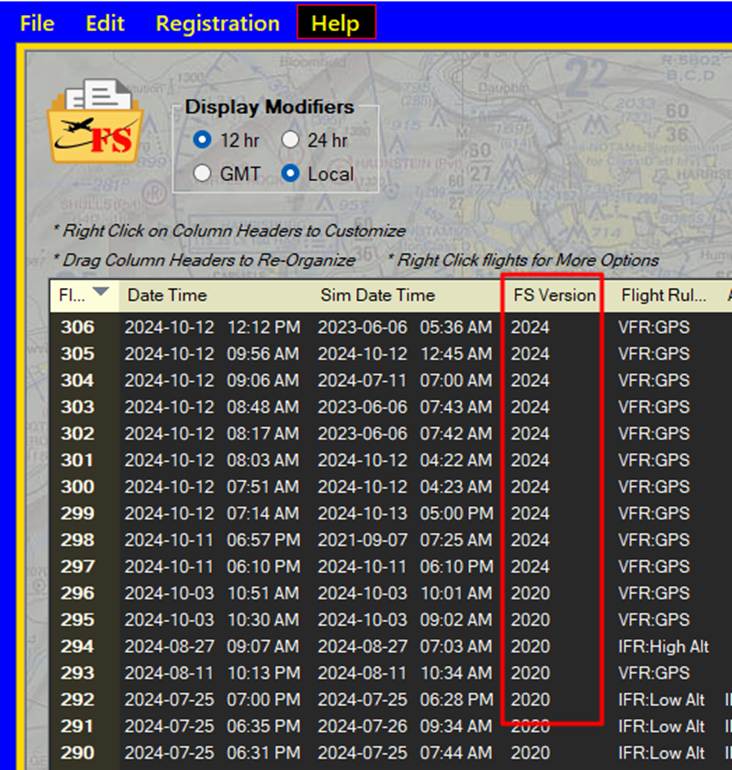
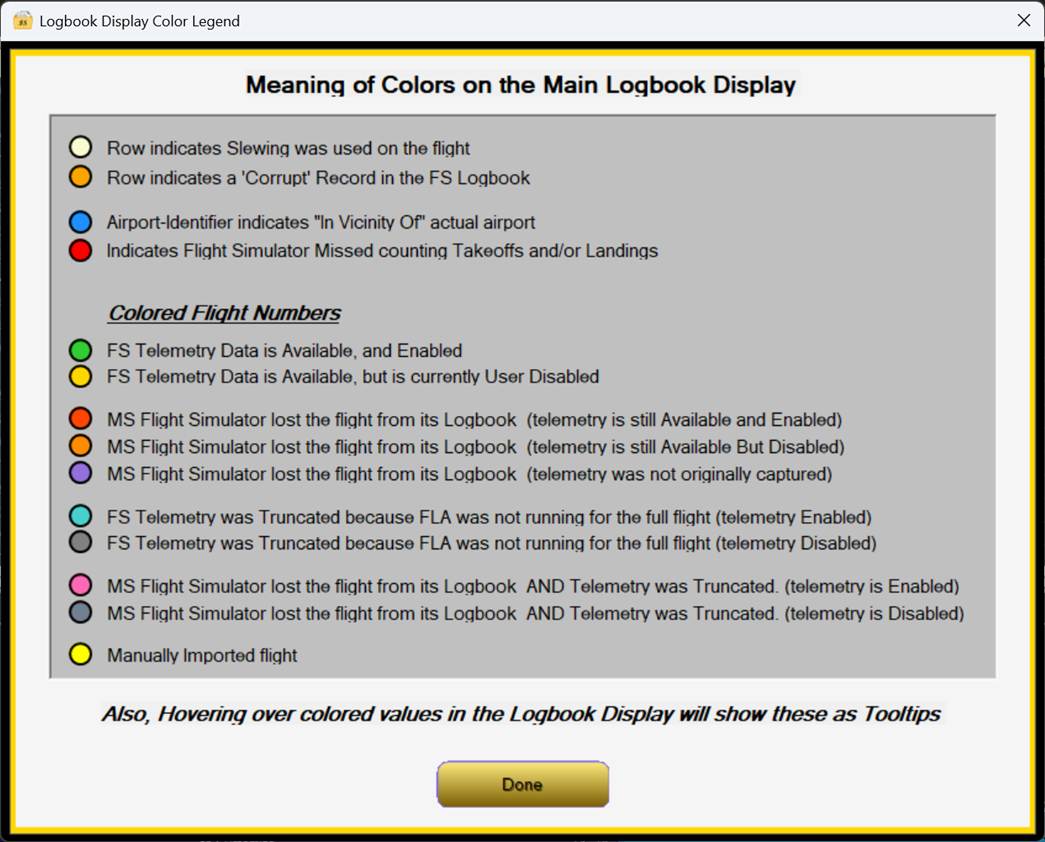
Highlighted Cells and Rows
FlightLog Analyzer uses color to flag special conditions in the logbook:
• Blue From/To airport cells — the flight departed or arrived near the listed airport rather than at it.
• Orange row — the record in Flight Simulator's logbook is corrupt (often the result of the sim crashing mid-flight).
• Yellow row — slewing was used during the flight.
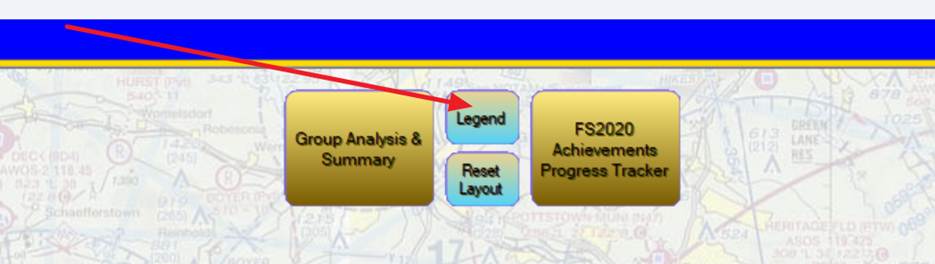
Click the Legend button on the main display for the full color key. The same information is available via tooltip on any colored cell or row.
Cell coloring legend
Logbook Utilization
Flight Simulator's logbook file is capped at 64 MB. Asobo improved the compression in later updates, but the size limit remains — roughly 15,000 average flights. The pie charts on the main display show how full each logbook is: green for FS2020, blue for FS2024.
Logbook utilization pie charts
Dark Mode
A dark theme is available for the main display and the Group Analysis display, which is easier on the eyes in dim lighting. Toggle it with F11, or via Edit → Toggle Dark Mode.
Grid Lines
Horizontal and vertical grid lines can be enabled independently on the main and Group Analysis displays:
• Ctrl+F11 — toggle horizontal grid lines.
• Shift+F11 — toggle vertical grid lines.
Both options are also available from the Preferences menu.
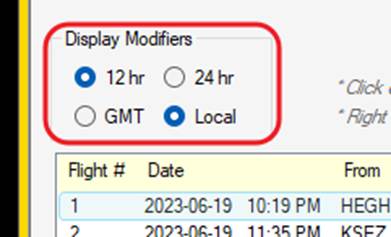
Display Modifiers
Date and Time Formatting
The radio buttons on the left side of the display let you switch dates and times between 12-hour and 24-hour format, and between UTC (Zulu) and your local time.
Column Customization
To hide unneeded columns, right-click anywhere on the column headers and uncheck them. The Flight Number column cannot be hidden.
Click a column header to sort by that column; click again to reverse the sort order. Drag and drop column headers to reorder them.
Lost-Flight Protection
Flight Simulator occasionally drops flights from its logbook when subsequent flights are recorded. Once a flight is gone from the logbook file, it's gone for good — there's no way to retrieve it from within the sim. For anyone trying to keep their logbook accurate, this is endlessly frustrating.
FlightLog Analyzer addresses this with Lost-Flight Protection. Every time the app starts and reads the logbook, it records information about every flight it sees. If a flight that was previously present is missing on a later read, FlightLog Analyzer recreates that flight in its own display.
The flight remains missing from Flight Simulator's logbook file, but FlightLog Analyzer treats it as though it were still there — flight times, distances, airports, takeoffs and landings, telemetry, maps, and altitude profiles are all preserved and included in your summaries and statistics.
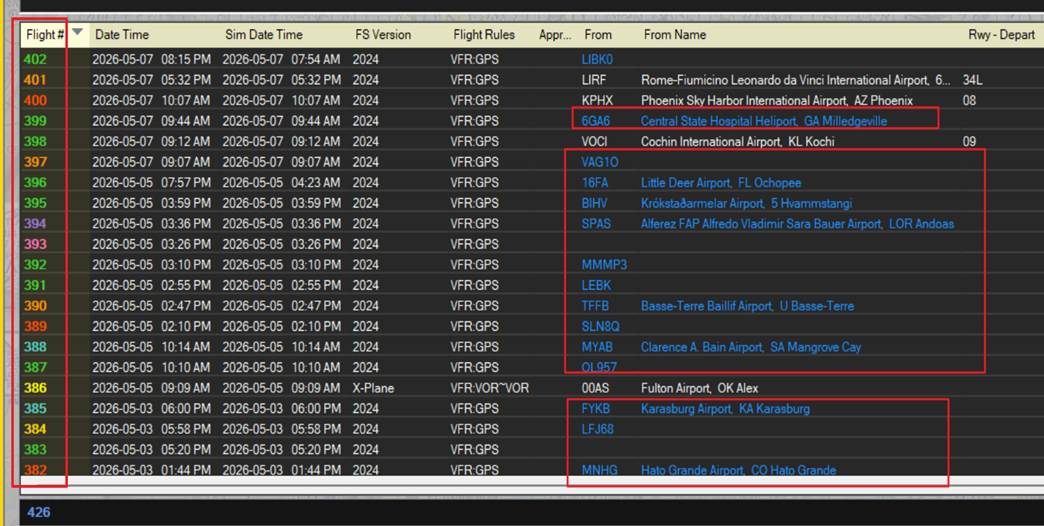
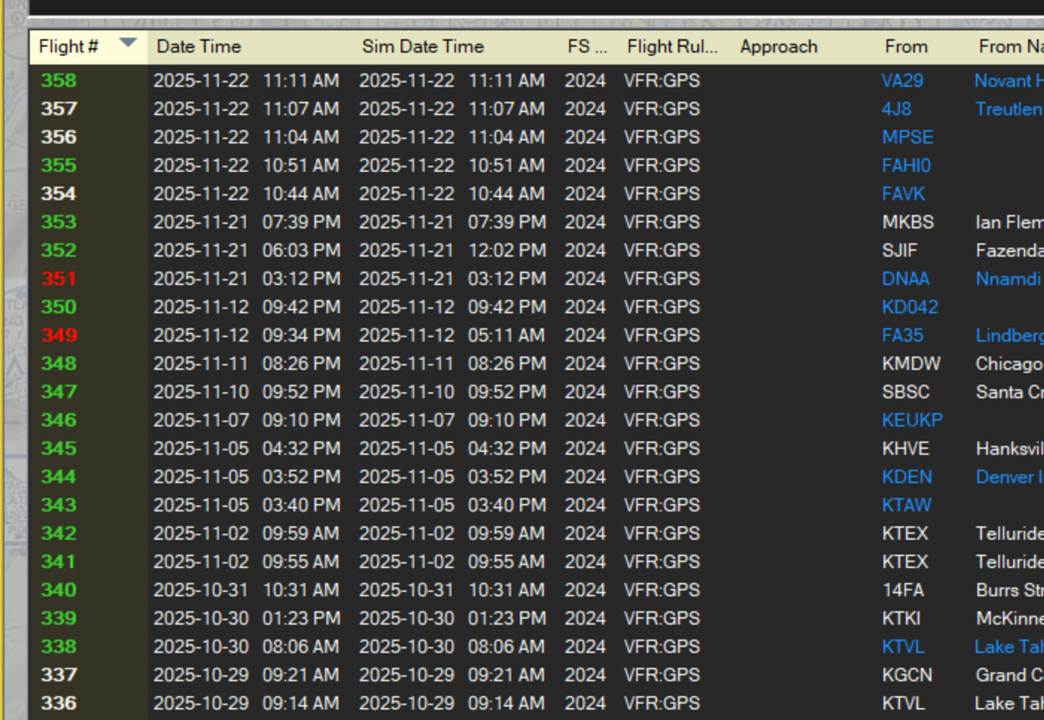
How Recovered Flights Are Displayed
Recovered flights are color-coded by their flight number:
• Red flight number — a lost flight was recovered and SimConnect telemetry was captured for it.
• Violet flight number — a lost flight was recovered but no telemetry was captured.
• White flight number — the flight is still present in Flight Simulator's logbook (normal state).
Importing Lost Flights
You can add lost flights to FlightLog Analyzer through one of two methods: a manual entry form, or a CSV import.
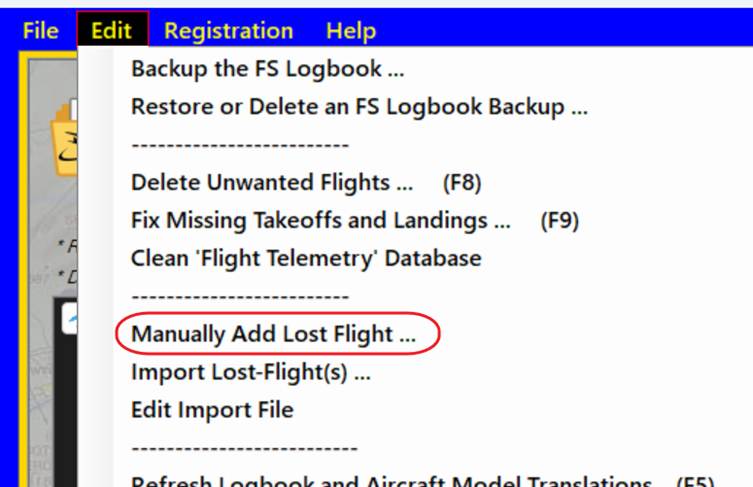
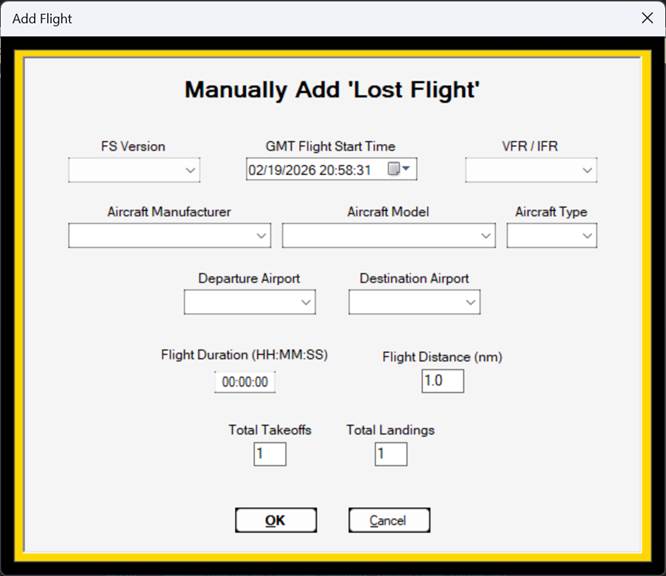
Manual Entry Form
Opens a simple dialog where you can recreate the basic attributes of a lost flight — date, time, airports, aircraft, duration. The flight is added to FlightLog Analyzer's internal lost-flight database and included in all statistics and summaries from then on.
This method covers basic flight attributes only.
CSV Import
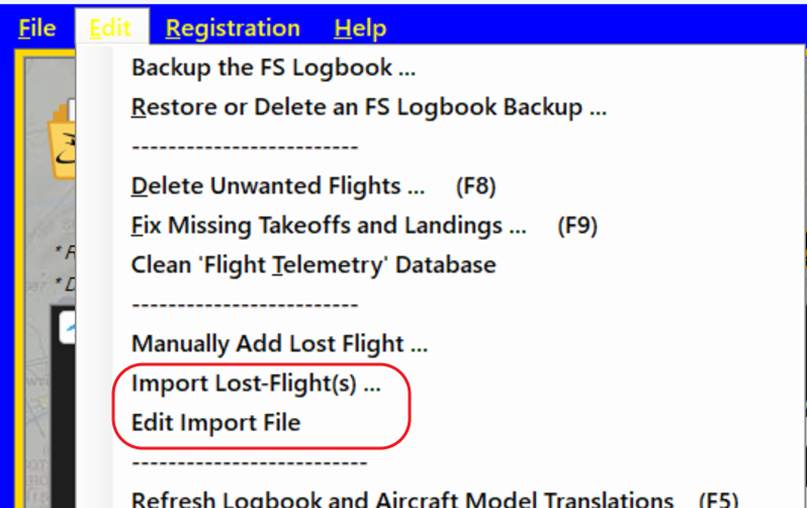
For more detailed lost-flight records, use the CSV import. Two relevant menu options:
• Edit Import File — opens the template file in your text editor. The header section describes the three accepted formats in detail.
• Import Lost-Flight — reads the CSV file and adds its flights to FlightLog Analyzer's database.
The default file ships with 12 example entries. You can import the file as-is to see how the entries appear in your logbook, then right-click those flights and choose Delete Lost Flights to remove them. To disable an example without deleting it, prefix the line with
! — lines starting with ! are ignored by the importer.
Importing X-Plane Flights
The lost-flight import can also be used to bring in flights from X-Plane 11 or X-Plane 12. FlightLog Analyzer reads the X-Plane Pilot.txt logbook format directly.
X-Plane logbooks are far more limited than MSFS logbooks. The available fields are:
• Date (YYDDMM)
• Departure airport
• Destination airport
• Landings
• Total flight time (hrs)
• Night flight time (hrs)
• Aircraft name (may include manufacturer and/or model)
IFR time, cross-country time, and tail number are present in the X-Plane logbook but are not currently used. Most importantly, X-Plane does not record GPS track data, so flight paths cannot be plotted for X-Plane flights.
The lost-flight import defaults to %localappdata%\FlightLogAnalyzer\Data\LostFlightImports.txt. You can paste X-Plane logbook entries into this file, or simply select the X-Plane Pilot.txt file directly when prompted.
Decoding the X-Plane "Aircraft Name" Field
X-Plane stores manufacturer and model together in a single Aircraft Name field. By default, FlightLog Analyzer places the entire string into the Aircraft Model column. You can split it into separate manufacturer and model values using the Aircraft-Model Name Translation feature (described later in this guide).
Example translations:
"Cessna_172SP_G1000", "172 with G1000", "Cessna"
"Bombardier_CL_300", "CL 300", "Bombardier"
"Car_TBM850", "TBM 850", "Socata"
"Car_PC12", "PC-12", "Pilatus"
SimConnect Telemetry
Flight Simulator exposes a real-time data feed through Microsoft's SimConnect API. FlightLog Analyzer subscribes to this feed and records the aircraft's state once per second — latitude, longitude, MSL and AGL altitude, true airspeed, ground speed, vertical speed, G-load, heading, and more.
Telemetry is what powers the high-resolution flight path on the map, the detailed altitude profile, and the entire Mission Debrief replay.
|
Note: Telemetry capture requires a PRO license once the trial period ends. |
To capture telemetry, FlightLog Analyzer must be running
throughout the entire flight — it sets up the SimConnect feed when Flight Simulator becomes active, and stops collecting when Flight Simulator closes. If FlightLog Analyzer isn't running while you fly, no telemetry is captured and the data is lost forever.
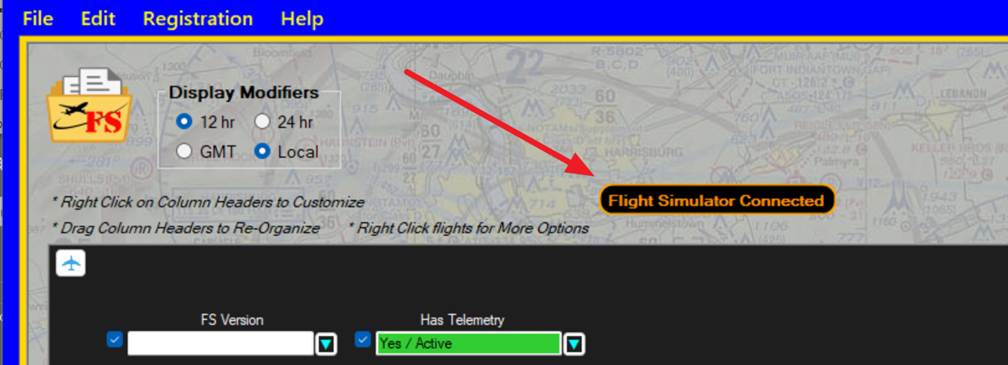
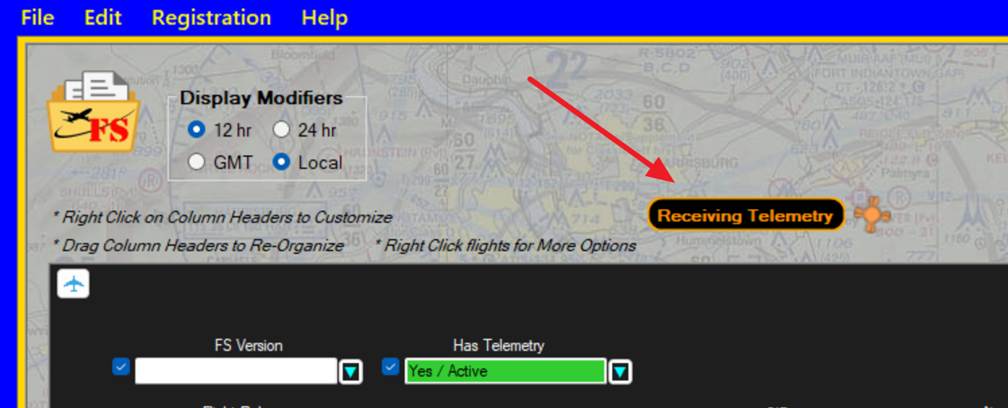
Start FlightLog Analyzer
before starting Flight Simulator. When the sim becomes active, you'll see Flight Simulator Connected in the status bar, followed shortly by Receiving Telemetry with a spinning asterisk that ticks with each data point recorded.
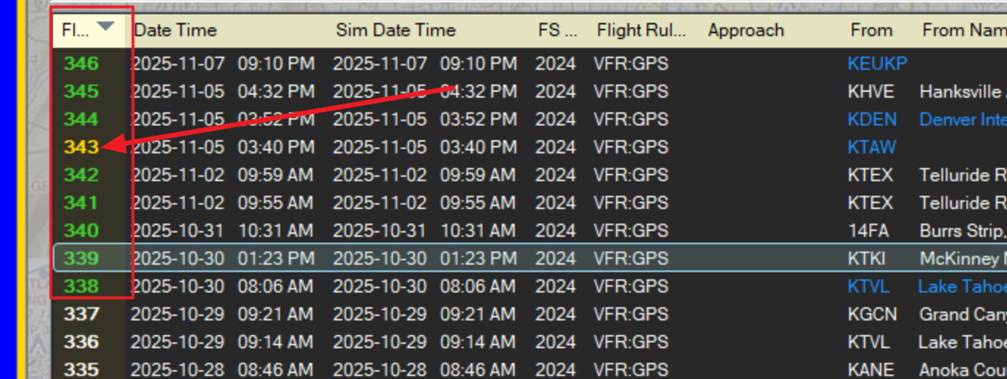
When the flight ends, the main display refreshes with the new entry. Flights that include telemetry are color-coded:
• Green — telemetry is captured and enabled.
• Gold — telemetry was captured but is currently disabled.
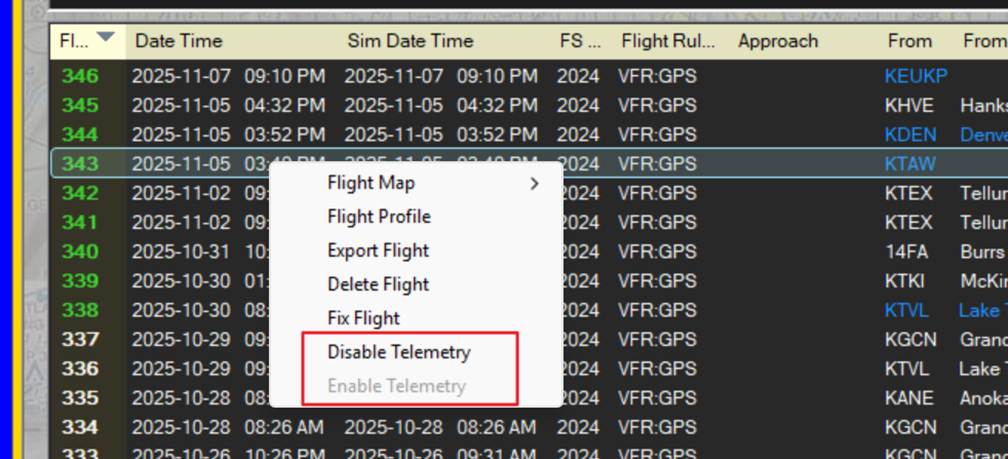
To toggle telemetry on or off for a flight, right-click it and select Disable Telemetry / Enable Telemetry. Disabling telemetry can be useful when you want to compare the sparse path stored in the FS logbook to the actual recorded telemetry path.
Truncated Telemetry
If FlightLog Analyzer wasn't running for the entire flight, part of the telemetry will be missing. The result is a track that ends (or starts) abruptly partway through the flight. Truncated-telemetry flights are color-coded on the main display (see the Legend) and start with telemetry disabled by default. You can still re-enable telemetry on these flights — it just won't cover the entire flight.
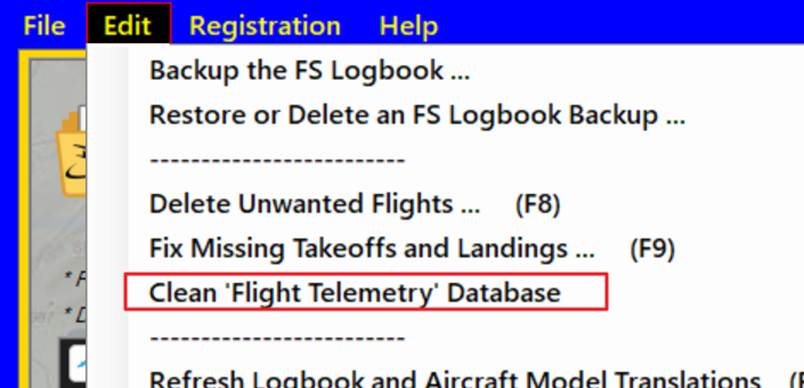
Cleaning the Telemetry Data
Telemetry can sometimes be captured outside the bounds of an actual flight — for example, while you're still on the menu screen or after the flight technically ended. If your telemetry database is taking up more disk space than you'd like, use
Edit → Clean "Flight Telemetry" Database to remove the extraneous data and shrink the file.
The telemetry database lives at %localappdata%\FlightLogAnalyzer\FlaTelemetry.db.
Deleting Flights
|
Important: When you delete a flight using the Logbook Cleaner, its telemetry data is permanently removed. Restoring an old logbook backup will not bring it back. |
Charts and Graphs Panel
The main screen can also display a row of charts summarizing your flying — usage stats, totals by aircraft type, monthly hours, and more.
To expand or collapse the panel, click the small airplane icon at the bottom-left of the main display.

Charts and Graphs panel expanded
Interaction tips:
• Use the mouse wheel to zoom in and out.
• Hold Ctrl while dragging to pan when zoomed in.
• Click and drag with the left mouse button to "rubber band" zoom to a region.
• Right-click for additional options.
There are more chart summary types than will fit in the five chart slots. Right-click a chart and choose Change Chart… to pick which summary appears in that position. Use Reset This Chart… to return a slot to its default.
ATC View — Real-Time Flight Map
The ATC View is FlightLog Analyzer's real-time moving map. It tracks your aircraft as you fly, painting the flight path behind you in your choice of color modes and overlaying a HUD with live telemetry, an altitude profile along the bottom, and aviation chart overlays on top of a real-world map.
|
Note: The ATC View requires a PRO license once the trial period ends. |
To use the ATC View, FlightLog Analyzer must be running concurrently with FS2020/FS2024 and must be running for the entire flight to capture the complete telemetry stream.
With FlightLog Analyzer running, the ATC View automatically opens and centers itself on your aircraft the moment you select a flight location in the sim. If you close the window mid-flight, press F6 (or use View → ATC View – Real-Time Flight Map) to reopen it. The full flight path collected so far is retained.
ATC View showing the aircraft, flight track, HUD, altitude profile, and aviation chart overlay
Aircraft Position and Flight Path
The aircraft icon marks your current position and heading. Trailing behind it is the path you've flown so far, color-coded according to the mode selected in the lower-left dropdown.
Changing the color mode mid-flight repaints the entire track immediately. The track persists through pauses and after the flight ends. Starting a new flight (or exiting the sim) clears it.
Color-By Modes
Choose from the following telemetry-based coloring modes:
• AGL Altitude — relative height above ground level. Red marks the lowest points; blue marks the highest.
• MSL Altitude — relative height above mean sea level. Same red-to-blue scale as AGL.
• True Airspeed — relative TAS. Red marks slow segments (near stall); blue marks the highest speeds.
• Ground Speed — relative ground speed. Useful for spotting headwind/tailwind effects when compared against TAS.
• G-Load — bright red for highest positive G; bright yellow for most negative; black for normal 1 G flight.
• Vertical Speed — bright green for highest climb rate; bright red for steepest descent; black for level flight.
• Sim Rate — segments flown under accelerated sim rates are colored distinctly, making it easy to spot where you fast-forwarded.
The HUD
The HUD floats over the map and displays live flight conditions in real time — altitude, airspeed, heading, G-load, vertical speed, and more. If you'd rather not see it, close it with the arrow at its upper-left corner. It can be reopened at any time from the View menu.
The Altitude Profile Section
Below the map is the altitude profile — a cross-sectional view of your flight that updates as you fly. Use the dropdown in the lower-right of the profile to choose what it plots: MSL, AGL, true airspeed, ground speed, G-load, or vertical speed. Max and min values for the selected parameter are shown on the left edge.
Mouse Hover on the Profile
Hovering the mouse over the profile marks that point with a green dot and displays the corresponding value at that moment in the flight. The same point is highlighted on the map above with a matching green dot, so you can see precisely where in the route a peak G-load or maximum altitude occurred.
While the mouse is in the profile section, the HUD switches to "history mode" — its text turns amber and it shows the telemetry values from that point in the flight rather than the live values. Move the mouse away and the HUD returns to real-time display.
Map Overlays — Aviation Charts
The control panel in the lower-left corner provides quick access to aviation chart overlays. The Map Overlay dropdown selects which chart to display:
• IFR Low Enroute
• IFR High Enroute
• VFR Sectional
• and others (see the dropdown for the current list)
|
Note: The VFR Sectional, TAC (Terminal Area), IFR Low Enroute, and IFR High Enroute overlays are USA-only. The FAA publishes its aeronautical charts in the public domain, which is what lets FlightLog Analyzer offer them freely. Most other civil aviation authorities don't release their charts that way, so for flights outside the USA the Worldwide Airspace overlay is the best (and effectively only) option. |
The Aviation Layer slider above the dropdown adjusts the overlay opacity, letting you balance chart readability against the underlying street/satellite map. When you switch between overlays, the layers cross-fade for a smoother transition.

Map Overlay options and Aviation Layer slider
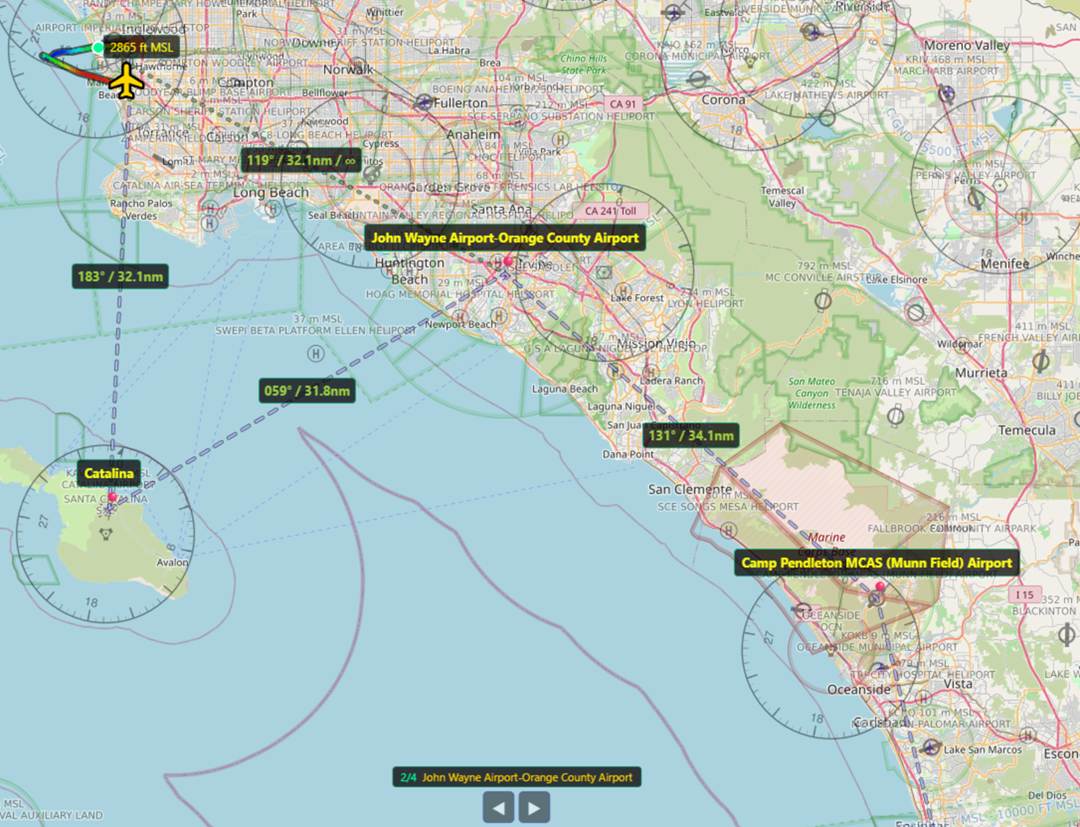
Destination Lines
When a flight plan with one or more waypoints is loaded, FlightLog Analyzer draws destination lines on the map to help you see the remaining route at a glance:
• Static dashed line — connects each waypoint in sequence all the way to your final destination, giving you a persistent picture of the planned route.
• Dynamic active-leg line — runs from your aircraft's current position to the active waypoint, updating in real time as you fly.
Each leg displays a bearing/distance label at its midpoint — for example,
183° / 32.1nm / 4min — so you can read the heading and distance for each successive fix without cluttering the waypoint markers themselves. The label on the active leg includes a third value: the estimated time to the next waypoint (or to the destination when no intermediate waypoints remain).
The time-to-waypoint value isn’t just “distance ÷ ground speed.” It uses only the component of your ground speed that lies along the bearing to the next point (and is then scaled by the current sim rate). In other words, it answers: at your present heading and speed, how fast are you actually closing on the waypoint? If your heading is straight at the target, the full ground speed counts and the time matches what you’d expect. As your heading drifts away from the target bearing, only the projected component counts, so the time gets longer. Once your heading is more than 90° away from the bearing to the waypoint, the projected component is zero or negative — you are no longer making any progress toward it — and the label shows ∞ to indicate that, at your current heading, you will never reach the waypoint.
Toggle destination lines on or off with F6 (or the Dest Lines: ON/OFF button in the control panel).
Change the contrast of the destination lines with the slider, to adjust for best visibility on the Map Overlay that you’re using

Contrast of Destination Lines
|
Note: On the first flight after starting MSFS, the en-route waypoints typically can't be plotted on the map. The destination airport still resolves correctly, so you'll see the active-leg line to the destination, but intermediate waypoint markers and per-leg labels will be absent. This is a known MSFS bug — not an issue in FlightLog Analyzer — and subsequent flights in the same MSFS session work normally. It is also a bug within MSFS that when importing a Flight Plan File (.PLN), the waypoints of the flight are likely to not resolve correctly. This is apparent within MSFS, as you will see the ‘World Map’ will not show the waypoints correctly after closing the Flight Plan Builder screen. |
Destination lines with per-leg bearing, distance, and ETA labels
Waypoint Sequencer
The active waypoint advances automatically as you fly: once your aircraft comes within roughly 1.5 nautical miles of the current fix, FlightLog Analyzer moves the active-leg line forward to the next waypoint in the route.
When you need to jump ahead or step back manually — for example, when ATC vectors you around a fix — use the left and right arrow buttons in the waypoint navigator at the bottom-center of the map. The navigator also shows your current position in the sequence (for example,
1/4 Catalina), so you always know which fix is active and how many remain.
Destination lines and the waypoint navigator
Automatic Destination Detection
FlightLog Analyzer uses a three-tier fallback chain to determine your destination airport when loading a flight:
1. First, it checks the ATC aircraft record in the .flt file.
2. If that's unavailable, it looks for an explicit Arrival ICAO field.
3. As a last resort, it parses the associated customflight.pln XML file — including flights where the world position is stored in degrees/minutes/seconds (DMS) format.
The result is that the destination airport label and its associated route lines resolve correctly for virtually any flight plan type, whether created by the sim's built-in planner or a third-party tool.
Other Controls
Zoom to Fit (F5)
Resizes the map to include the entire flight path. It zooms once per press — it does not continuously re-fit.
Auto-Center (F4)
Toggles automatic centering. When on, the map continuously re-centers on the aircraft so your plane stays in the middle of the view.
Destination Lines (F6)
Toggles the destination lines (described above) on and off.
Clear Current Flight Tracks
At the top of the map, the Clear Current Flight Tracks button erases the painted flight path without affecting the underlying telemetry. Useful if you want a clean canvas mid-flight.
Mission Debrief — Historical Flight Replay
Where the ATC View tracks your active flight in real time, Mission Debrief brings the same precision to your historical flights — letting you relive and analyze every moment after the wheels are down.
Mission Debrief uses the same map, HUD, and altitude-profile layout as the ATC View, with one key difference: every parameter, overlay, and color-by mode can be selected independently of the original flight. You can re-examine a flight in MSL coloring even if you flew it watching AGL, or pull up the IFR Low chart over a flight you originally flew on a VFR sectional.
|
Note: Mission Debrief is available only for flights that captured SimConnect telemetry. Requires a PRO license once the trial period ends. |
To open Mission Debrief, right-click any flight that captured telemetry and choose Mission Debriefer.
Right-click context menu showing Mission Debriefer option
HUD Replay Mode
When a replay is loaded, the map enters HUD Replay Mode:
• The flight track is rendered with an amber color shift to make it visually distinct from a live ATC View track.
• A ⌛ HISTORY badge appears in the corner as a constant reminder that you're viewing recorded data rather than a live flight.
• The HUD shows telemetry values from the recorded data, scrubbable via the replay controls.
•
Mission Debrief in HUD Replay Mode
Waypoints in Replay
Mission Debrief faithfully reconstructs your planned route during playback, including all intermediate fixes that were active when the flight was recorded. The destination lines, the bearing/distance midpoint labels, the waypoint sequencer, and the navigator counter at the bottom of the map all behave exactly as they did during the live flight.
|
Note: The same first-flight MSFS bug applies here: if a flight was recorded as the first flight after starting MSFS, the en-route waypoints will be missing from its replay too. The destination is still shown, but the route between origin and destination will be plotted without the intermediate fixes. |
Map Overlays and Color-By Modes
All of the ATC View's map controls are available in Mission Debrief: the aviation chart overlays (IFR Low/High, VFR Sectional, etc.), the opacity slider, and all color-by modes (AGL, MSL, true airspeed, ground speed, G-load, vertical speed, sim rate). Change them freely — you're not bound to whatever you had configured during the original flight.
Profile Scrubbing
Just as in the ATC View, hovering the mouse over the altitude profile marks the corresponding point on the map and switches the HUD into history-mode display for that moment in the flight. This is the fastest way to find peak G-events, maximum altitudes, or specific points along the route.
Multiple Debrief Windows
By default, you can open multiple Mission Debrief windows side by side. To restrict this to a single open debrief at a time, enable Allow Only 1 Open Mission Debrief in the User Preferences.
Flight Map and Flight Profile for Historical Flights
Aside from the full-featured Mission Debrief, FlightLog Analyzer offers two lighter-weight visualizations for any flight in your logbook: the Flight Map and the Flight Profile. Both are reached by right-clicking a flight on the main display (or on the Group Analysis display) and selecting from the context menu:
• Flight Map — the path across the ground
• Flight Profile — altitude (and optionally speed) vs. time or distance
• Export the selected flight(s)
• Delete the selected flight(s) with the Logbook Cleaner
|
Note: To see "Google Earth" as a Flight Map option in the context menu, Google Earth Pro must be installed. If you don't want to install it, you can still export flights as KML and import them into the web-based version of Google Earth. |
Flight Map
Right-click → Flight Map opens the path of the flight on a map of the Earth. You can use the built-in viewer, or — if Google Earth Pro is installed — view it in 3D in Google Earth. Multiple flights can be selected and displayed on the same map in either viewer.
Built-In Viewer
The menu in the upper-right corner of the map offers these display options:
• Satellite Overlay — turns on satellite imagery. Deselect for a standard street view.
• Basic Flight Path — draws a red line directly connecting origin to destination (great-circle).
• Raw Flight Path — draws a black line through the original sparse points logged by Flight Simulator, with no smoothing applied.
• Smoothed Flight Path — draws a green line representing FlightLog Analyzer's best guess at the actual path between the sparse logbook points.
• Telemetry Flight Path — draws a blue line tracing the true high-resolution path. Only available when telemetry was captured and is currently enabled for the flight.
• Origin / Destination — toggles the green and purple markers at the start and end points of the flight.
Smoothed Raw Logbook Tracks vs. Telemetry Tracks
The contrast between the raw logbook path and the telemetry path is striking. The raw logbook stores only a handful of points — sometimes as few as six for a multi-hour flight — and the smoothing algorithm does its best to interpolate between them. Telemetry, by comparison, records once per second and produces a path that matches the actual flight exactly.

Raw and Smoothed paths in the Built-in Viewer
Telemetry path in the Built-in Viewer
Google Earth Pro
When Google Earth Pro is installed, you can view the flight path in full 3D — pan, rotate, and zoom to examine it from any angle. The layer panel on the left of Google Earth, under Temporary Places → FlightLog Analyzer, contains:
• Start and End Markers — toggle the origin/destination markers.
• Detailed Routes — green line showing the smoothed path (or the true telemetry path, when telemetry is enabled).
• Raw Routes — red line showing the original Flight Simulator path with no smoothing.
Default settings for which layers to include can be configured in the User Preferences.

Flight path in Google Earth Pro
Flight Profile
Right-click → Flight Profile opens the altitude profile of the flight. Use the Time / Distance buttons at the top to toggle between altitude vs. time and altitude vs. distance flown.
Flight Profile — altitude vs. time
Flight Profile — altitude vs. distance
The chart can display up to three altitude curves and a speed curve:
• MSL — altitude above mean sea level, in feet.
• AGL — altitude above ground level, in feet.
• Ground Elevation — the terrain elevation under the aircraft, calculated as MSL minus AGL.
• Speed — true airspeed in knots. Only available when telemetry was captured for the flight.
The Ground Elevation curve is optional and can be toggled in the User Preferences.
Flight Filtering
The Flight Filtering feature limits the flights shown on the main display to those matching one or more criteria — say, all flights originating from a particular airport, all flights in a specific aircraft model, all flights flown in IFR conditions, or any combination of these.
Filtering affects more than just the table: the Charts and Graphs panel updates to summarize only the filtered flights.
Basic Use
1. Click the icon in the left corner of the filter panel to expand it. A selection box appears for each filterable column.
Filter panel collapsed and expanded
2. Click the cyan down-arrow on a filter to open its dropdown. The dropdown lists every value present in that column.
3. Check the values you want to keep. The selection control is shaded green to show that criteria are queued, but filtering is not yet active.
4. Click the Activate Filters button to apply your selections. The main display and the charts update to include only matching flights.
5. Add more filters as needed. Multiple filters combine with AND logic — a flight must match every active filter to be included.
6. Click Deactivate Filters to temporarily turn filtering off without clearing your selections; click Activate Filters again to re-apply. Click Reset Filters to clear all selections and start fresh.
Type and Return
Instead of opening a filter's dropdown and checking boxes, you can type directly into the filter's text box and press Return. Whatever values match your typed text are selected and the filter is applied immediately.
For example, typing
ksez into the Origination Airport filter and pressing Return adds KSEZ to the active filter and refreshes the display.
You can type into multiple filters in succession — each Return applies that filter on top of any others already active.
Partial Matches
The text-entry feature also accepts partial strings. Type
ILS into the Planned Approach filter and press Return to display every ILS approach in your logbook, regardless of runway number.
If the dropdown is open while you type, the list of options narrows dynamically with each character.
Excluding Instead of Including
Every filter has a checkbox to the left of its text box. By default, this checkbox is checked, meaning "include only the selected values." Uncheck it to invert the filter: the display will exclude the selected values instead.
For example, under the Flight Simulator Version filter, selecting 2020 with the checkbox
checked shows only FS2020 flights. Selecting 2020 with the checkbox unchecked shows everything except FS2020 flights.
Clearing Individual Filters
The Reset Filters button clears every filter, but if you want to clear just one, triple-click its text box. (Double-click works too, but if the filter is currently active — shaded green — you'll need the third click.) The selection clears and the filter returns to its "show everything" default.
Group Analysis and Summarizing
Group Flights By categorizes and summarizes your flights by any flight attribute. A handful of common groupings include:
• 30, 45, 60, or 90 day summaries
• Aircraft type, model, or manufacturer
• Weather conditions
• Flight Simulator version (2020 or 2024)
• Flight type (Discovery, Free Flight, Tutorial Missions, Landing Challenges, etc.)
• Flight end status (Success, Crash, Unsuccessful Mission, Incomplete, etc.)
The Limit to Last selection further restricts the results to flights occurring within the last N days.
Group Analysis grouped by aircraft type
All the right-click options from the main display are also available here — Flight Map, Flight Profile, Export, and Delete via Logbook Cleaner.
Drilling Into a Group
Each row on the Group Analysis window represents a collection of individual flights. To see those flights, right-click a row and select Group Details (or simply double-click the row).
The main display will be filtered to show only the flights in that group. You can double-click another row to see its flights, or close the Group Analysis window to return to the full unfiltered logbook.
In this example, a user has flown ILS and RNAV approaches. The RNAV row shows seven flights; double-clicking it filters the main display to those seven flights so they can be examined individually.
FlightLog Exporter
The exporter can write your logbook out in a variety of formats, for use in other flight-tracking applications or just for safe-keeping. Open it from File → Export…
Export dialog
Export Format
Choose the file type that matches your destination application:
• .CSV — one flight per line, attributes separated by commas. Universally readable.
• .XML — structured format suitable for cross-application data exchange.
• .KML — for mapping applications, including Google Earth and Google Maps.
• LNM — CSV variant for Little Navmap. See Troubleshooting for import notes.
• Volanta — CSV for the Volanta application. See Troubleshooting.
• SKTP — CSV for SimToolKitPro. See Troubleshooting.
• Sky Dolly — GPX format, one file per flight. See Troubleshooting.
Export Content
• Basic Flight Info — flight attributes only (date, airports, aircraft, times, etc.). Does not include the GPS track.
• Basic + Flight Route — everything in Basic Flight Info plus the GPS coordinates of the flight path.
Flight Numbers
To export a subset of flights, enter their numbers in the Flight Number(s) to Export field. Use commas to separate individual numbers and dashes for ranges (for example,
3-7, 12, 15-20). Leave the field blank to export every flight.
User Preferences
General preferences for FlightLog Analyzer live under Edit → Preferences… Each option is described briefly below.
User Preferences dialog
• Auto-Launch ATC View — opens the real-time moving map automatically when a flight starts in the sim. If disabled, you can still open the map manually with F6 or via View → ATC View – Real-Time Flight Map.
• Show Basic Flight Paths — toggles the straight-line connection between flight start and end on the Flight Map.
• Show Raw Flight Paths — controls whether the raw (un-smoothed) Flight Simulator path is included when exporting to Google Earth. Has no effect on the Built-in Viewer, which always shows both.
• Smooth Altitude Profiles — applies smoothing to altitude curves to soften the abrupt jumps that result from Flight Simulator's sparse GPS logging.
• Use Larger Font — increases the font size on the main and Group Analysis grids.
• Highlight Slewing Flights — yellow row highlight for flights that used slew mode.
• Highlight "In Vicinity" Flights — blue cell highlight when Flight Simulator records a flight as landing "in the vicinity of" an airport rather than at it.
• Use Satellite Overlay — default to satellite view (vs. street view) on the Flight Map.
• Allow Only 1 Open Built-In Map Viewer — when set, opening a new Flight Map closes any previously open one. Affects the Built-in Viewer only, not KML viewers.
• Allow Only 1 Open Mission Debrief — when set, opening a new Mission Debrief closes any previously open one.
• Allow Only 1 Open 'Profile Viewer' — same idea for Flight Profile windows.
• Show Calculated Elevation — draws the ground elevation curve on the Flight Profile.
• Flattened Altitude — pins the altitude line to the ground on Flight Maps (effectively hides altitude).
• Extrude Altitude — draws a vertical "curtain" between the altitude line and the ground.
• Short Flight Duration — defines the time threshold below which a flight is considered "undesirably short" by the Logbook Cleaner's auto-select feature.
• Short Flight Distance — same idea for distance.
• Steam Options — your Steam ID for the Achievements Tracker. Only enabled when you have one MS Store install and one Steam install loaded simultaneously.
• Waypoints — ATC View — controls which categories of navigation fixes appear on the real-time ATC View map: Traffic Pattern (airport approach/departure waypoints from the active flight plan), Intersections (named airway and RNAV fixes), VORs, and NDBs. Each can be toggled independently.
• Waypoints — Mission Debrief — same four toggles for the Mission Debrief replay map. Settings are independent of the ATC View, so the categories you display while flying don't have to match what's shown during playback.
Logbook Cleaner
The Logbook Cleaner permanently removes unwanted flights from Flight Simulator's logbook. It's a PRO-license tool, available from Edit → Delete Unwanted Flights…
|
Important: This tool literally modifies Flight Simulator's logbook file. Although a backup is made automatically before every edit, making your own backup for safe-keeping is wise — use Edit → Backup the FS Logbook. |
|
Important: When you press the SNIP! button, the listed flights are stripped from the logbook permanently. The next time you start Flight Simulator, those flights will no longer exist. They can be restored only by restoring an earlier logbook backup. Telemetry data for deleted flights is also permanently lost and will not be restored by reverting to a logbook backup. |
|
Important: Do NOT use this tool while Flight Simulator is running — the logbook is being rewritten. |
Choosing Which Flights to Delete
You have three options for selecting flights for deletion:
1. Manual flight number entry
Type flight numbers directly into the input box. Flight numbers begin at 1 (not 0), so 1 is the first flight in the logbook. Separate individual numbers with commas, or use the shorthand
start-end for ranges. For example, 3-7 is equivalent to 3, 4, 5, 6, 7.
2. Auto-select by attribute
• Short Duration Flights — selects every flight shorter than N minutes (N comes from User Preferences).
• Short Distance Flights — selects every flight shorter than N nautical miles.
• Crashed Flights — selects every flight that ended in a crash according to Flight Simulator.
3. Select from the main display
Highlight the rows you want to delete on the main display (Shift/Ctrl for multi-select), right-click, and choose Delete Flight(s) from the popup menu. The Logbook Cleaner opens pre-populated with those flight numbers.
If multiple methods are used at once, the combined set of flight numbers is generated.
When you're ready, press SNIP! — a backup is made automatically, and a confirmation dialog tells you how many flights are about to be deleted before any change is applied.
Logbook Cleaner dialog
Restore Points
Every Logbook Cleaner operation creates a restore point. To revert, use Edit → Restore FlightLog… Each restore point shows the date, time, and filename of the saved logbook.
Select the version you want and click Restore. The master logbook file is overwritten with the version you chose.
To delete restore points you no longer need, select them and press the Delete key — the records are removed from the display. Press Proceed to actually move the backup files to the Recycle Bin.
|
Important: Just as with the Logbook Cleaner, do not use the Restore tool while Flight Simulator is running. |
Checkpoint Restore tool
Checkpoint Restore tool
Flight Fixer
The Flight Fixer corrects flights with missing takeoffs and/or landings — those frustrating logbook entries where Flight Simulator records the flight but logs zero takeoffs or landings. This is a PRO-license tool, available from Edit → Fix Missing Takeoffs and Landings…
Which Flights Are Eligible
A missing takeoff can be restored if the flight:
• Did not start "in vicinity" of an airport — it must start at an airport.
• Started on the runway, at a gate, or on the ramp.
• Did not end in a crash (it may have crashed at takeoff).
• Is a Free Flight (the only flight type eligible for correction).
A missing landing can be restored if the flight:
• Was actually airborne before landing.
• Did not end in a crash.
• Did not end "in vicinity" of an airport — it must end at an airport.
• Is a Free Flight.
Flights eligible for correction are marked in red on the main data table.
|
Important: Like the Logbook Cleaner, the Flight Fixer literally modifies Flight Simulator's logbook. Automatic backups are made before every edit, and you can also make manual backups via Edit → Backup the FS Logbook. |
|
Important: Do NOT use this tool while Flight Simulator is running. |
Choosing Which Flights to Correct
Three options, parallel to the Logbook Cleaner:
1. Manual flight number entry
Same syntax as the Logbook Cleaner — comma-separated numbers and dash-separated ranges.
2. Auto-select
• Missing Takeoffs — selects every flight that's missing a takeoff.
• Missing Landings — selects every flight that's missing a landing.
3. Select from the main display
Highlight the rows on the main display, right-click, and choose Fix Flight(s). The Flight Fixer opens pre-populated with those flight numbers.
When you're ready, press Fix It! — an automatic backup is made and a confirmation dialog appears before any changes are applied.
Restore Points
Flight Fixer uses the same restore-point system as the Logbook Cleaner. To roll back changes, open Edit → Restore FlightLog… and select the appropriate restore point.
Achievements Progress Tracker
Ever struggled to complete a Flight Simulator achievement, baffled about which services or aircraft you're still missing? The Achievements Progress Tracker is built for exactly that.
It pulls your achievement status directly from your Microsoft / Xbox account in real time, displays your progress without making you launch the sim, and — where possible — provides guidance on what activities remain to complete each achievement.
Logging In
Because the Tracker queries your Microsoft / Xbox account, an active internet connection is required, and you must sign in. The first time you open the Tracker, your web browser will be redirected to the Microsoft / Xbox login page. After a successful login, control returns to FlightLog Analyzer and your achievements populate.
Login tokens are typically good for 12+ hours. While they're valid, the Achievements page opens immediately without requiring another login.
|
Note: FlightLog Analyzer reads only achievement statistics — no other personal information is accessed. |
Steam Installations
Achievements work somewhat differently on Steam than on the Microsoft Store version. The Microsoft Store implicitly tracks "percent complete" for each achievement; Steam does not. FlightLog Analyzer reconstructs those values for Steam users, but because Asobo doesn't publish their exact calculation, results may differ slightly from what you see in the sim.
To use the Achievements Tracker with a Steam installation:
1. Enter your Steam ID in the Preferences menu (the field is only enabled when both Steam and MS Store installations are detected).
2. Set your Steam profile's My Profile (or at least Game Details) to Public.
If the Tracker tries to access your achievements while your permissions are still private, FlightLog Analyzer will automatically open the Steam privacy settings page for you. Manual steps:
1. On the Steam website or app, click your nickname (upper-right) and choose View my Profile.
2. Click Edit Profile.
3. Go to the Privacy Settings tab.
4. Set My Profile (or at least Game Details) to Public.
|
Note: No private, confidential, or sensitive information is disclosed by setting Game Details to public. |
FS2024 Achievements
FS2024 achievements are not yet supported.
Further Reading
For more on Flight Simulator achievements:
• flight.wiki.gg — MSFS 2020 Achievements
• gamepressure.com — MSFS Achievements list
Aircraft-Model Name Translation
Flight Simulator records aircraft model names with all sorts of trailing detail — N-numbers, livery colors, variant codes, and other quantifiers that don't really matter when you're trying to summarize "how much King Air time have I logged?" The Aircraft-Model Name Translation feature lets you collapse all those variants into a clean, canonical name.
Translations affect only what FlightLog Analyzer displays — your Flight Simulator logbook is not modified.
Example 1: Consolidating Variants
Say your logbook contains flights in multiple variants of a Beech King Air 350 and a Beech V35B Bonanza. By default, the Group Analysis would split them across many rows. To consolidate them all under a single name, edit the translations file via Edit → Edit Aircraft Model Translations (or press F10).
The file uses CSV format with two required columns and an optional third:
• Column 1 — the Aircraft Model substring to match against.
• Column 2 — the replacement Aircraft Model name.
• Column 3 (optional) — the replacement Manufacturer name.
To consolidate every V35B Bonanza variant under one name, add this line:
"Beechcraft V35B Bonanza", "Beechcraft V35B Bonanza"
This tells FlightLog Analyzer that any model name containing "Beechcraft V35B Bonanza" should be replaced with "Beechcraft V35B Bonanza" — effectively trimming any trailing variant detail.
You can also rewrite the name entirely. For example:
"Beechcraft V35B Bonanza", "Red Rubber Ducky"
…would make every V35B Bonanza show up in the display as "Red Rubber Ducky."
Example 2: Replacing the Manufacturer Too
To both rename a model and replace its manufacturer:
"Beechcraft King Air 350", "King Air 350", "Beech"
Press F5 to refresh, and every King Air 350 variant displays with the model "King Air 350" and the manufacturer "Beech."
Example 3: Wildcards
An asterisk (*) matches any sequence of characters — a Joker, in poker terms. For example:
"Beech*350*", "Beechcraft King Air 350"
…matches any model name that contains "Beech" followed somewhere by "350." This is convenient but powerful, so be careful — that pattern would also match "Beech Comber Classic N1350B" and rewrite it as "Beechcraft King Air 350," which probably isn't what you want. Tighten your pattern when ambiguity is a risk.
Example 4: Regular Expressions
If you're comfortable with regular expressions, FlightLog Analyzer accepts them directly. A full RegEx tutorial is beyond the scope of this guide, but here are two illustrative examples.
Removing color from "Pilatus PC-6 Red N222A" while keeping the tail number:
"Pilatus PC-6 (*) (*)", "Pilatus PC-6 $2"
The parenthesized groups are numbered left to right — $1 is the first, $2 is the second. The substitution string keeps "Pilatus PC-6" and appends only $2 (the tail number), discarding $1 (the color).
Collapsing every PA-24 Comanche variant in the 200hp range under a single name:
"(*) (PA-24)-(2[0-9]{2} Comanche) (*)", "PA-24 (200 Series)"
This pattern matches "anything PA-24-2xx Comanche anything" regardless of manufacturer or trailing detail, and rewrites all of them to "PA-24 (200 Series)." A parallel entry can be added for the 300 Series:
"(*) (PA-24)-(3[0-9]{2} Comanche) (*)", "PA-24 (300 Series)"
Notes
• Lines beginning with # are comments and are ignored by the parser.
• Standard RegEx uses .* for "any characters." FlightLog Analyzer also accepts a bare * as shorthand to keep your translation file more readable.
• Trailing items on a translation line are treated as comments — you can add reminders to yourself:
"Pilatus PC-6 (*) (*)", "Pilatus PC-6 $2", "removes color, keeps tail"
Auto-Archive and Manual Backups
FlightLog Auto-Archive
Every time a new or modified FS2020 or FS2024 logbook is loaded, FlightLog Analyzer archives a copy automatically. This is essential protection: when you eventually uninstall FS2020, the original FS2020 logbook is deleted along with it. The archived copy lets FlightLog Analyzer keep showing your historical FS2020 flights as part of the consolidated view.
Archived logbooks are stored at: %localappdata%\FlightLogAnalyzer\FS2020 Archive
After uninstalling FS2020, choose the archived file when assigning the FS2020 logbook via File → Choose Logbook File(s).
Manual Backups
You can back up Flight Simulator's logbook at any time, for any reason. Use Edit → Backup FlightLog… One creative use: keep a separate logbook for each aircraft type, restoring the appropriate one before a session — useful for keeping helicopter time, GA time, and airliner time cleanly separated.
Manual backup dialog
Hot-Key Quick Access
Hot keys speed up common actions, especially useful when you're mid-animation or deep in the data table and don't want to leave for the menu. The most commonly used hot keys are listed below — press F1 inside the application for the complete list.
|
F1 |
Show the complete in-app hot-key reference |
|
F2 |
Open the User Guide from FlightLogAnalyzer.com |
|
F3 |
Refresh the logbook display from the current FS logbook file |
|
F4 |
Open the Preferences form (or toggle Auto-Center in ATC/Debrief windows) |
|
F5 |
Refresh the main display, re-reading the logbook and AircraftModelTranslation.txt (or Zoom-to-Flight in ATC/Debrief) |
|
F6 |
Toggle destination lines on the ATC/Debrief map (or open the ATC View) |
|
F7 |
Open the Logbook Exporter |
|
F8 |
Open the Logbook Cleaner |
|
F9 |
Open the Flight Fixer |
|
F10 |
Open the Aircraft Model Translation file in Notepad |
|
F11 |
Toggle Dark Mode |
|
Ctrl+F11 |
Toggle horizontal grid lines |
|
Shift+F11 |
Toggle vertical grid lines |
|
Ctrl+F10 |
Open the color customization file |
|
Esc / Ctrl+W |
Close the active window or dialog (does not close the main form) |
Custom Colors
A subset of FlightLog Analyzer's colors can be customized via a plain-text file. Open it with Edit → Edit App's Color Selections (Ctrl+F10), or directly at:
%LocalAppData%\FlightLogAnalyzer\Colors.txt
Change the named color values to whatever you like. Only the entries listed in the file are customizable.
For a complete list of valid C# color names, see flounder.com/csharp_color_table.htm.
Command-Line Interface (CLI)
The CLI lets you script common operations without opening the UI. The supported operations are creating backups of the FS202x logbooks, and performing exports.
To list the supported arguments, run with --help. The notation -m, --mode indicates that the short and long forms are equivalent.
The first usage example creates an export, behaving exactly as the in-UI exporter does. The example arguments produce a CSV export of flights 1–5, 8, and 10–15, with the current date substituted into the output path and the current time into the filename. The
--details flag tells the export to include the GPS path coordinates.
The second example creates a backup of the FS202x logbook. The same date/time substitutions are made, along with a {count} placeholder for the number of records in the backup.
Running FlightLog Analyzer on Linux
This guide was contributed by user Gabriele Marrè Brunenghi.
There are several ways to run a Windows .exe on Linux. For simplicity, this walk-through uses Lutris.
Step 1: Install Lutris
Follow the official instructions at
Step 2: Install FlightLog Analyzer
1. Launch Lutris.
2. Click the + button in the upper-left corner.
3. Choose Install Windows game from an executable.
4. Name the app whatever you like; keep Windows 10/11 as the system.
5. Choose Wine Setup file Install → Continue.
6. Click the three-dots button and select the installer.exe you downloaded from FlightLogAnalyzer.com.
7. Click Install.
8. Follow the installation, leaving the defaults — but uncheck the "Launch" box at the end.
9. Close the installation window.
Step 3: Create a Symbolic Link to Your Logbook
If you launch MSFS from Steam, the logbook path is buried and hidden by default. Creating a symlink to it makes navigation much easier.
1. In your file manager, enable Show Hidden Files (under View).
2. Pick an easy-to-find location for your link — Documents, for example.
3. Create a symbolic link to your logbook file using the method appropriate to your distro. In SteamOS: right-click → Create New → Link to File or Directory → browse to file → Link to File.
Typical paths:
/home/<user>/.steam/steam/userdata/<steam-id>/<game-id>/remote/kh_logbook
• user — your Linux username (default is "deck" on SteamOS).
• steam-id — usually the folder with the largest number. Verify by looking inside for the game-id folder.
• game-id — 1250410 for MSFS2020, 2537590 for MSFS2024.
Step 4: Load the Logbook
1. Launch FlightLog Analyzer via Lutris.
2. Dismiss any errors that appear — Lutris can't auto-find the logbook.
3. Choose File → Manually Load Logbook.
4. In the file dialog, navigate to your symlink (the path begins at /home/<user>/, e.g. /home/deck/Documents on SteamOS).
5. Select the kh_logbook symlink. Done.
|
Note: Lutris can create a Steam entry for the app, allowing you to launch it in Big Picture or Game Mode, but some additional tweaking is required for it to display correctly. Currently not recommended. |
Glossary
Instrument Approach Suffixes
A suffix on an instrument approach name — such as the "Y" or "Z" in "ILS-28-Y" — indicates that more than one approach exists to the same runway using the same type of navigation aid. The suffixes distinguish between approaches that may have different procedures, minimums, or equipment requirements.
Key points:
• Multiple approaches — when two or more straight-in approaches exist to the same runway using the same guidance type (ILS, RNAV, etc.), a letter suffix differentiates them.
• Different procedures — each approach may have different entry procedures, missed approach procedures, or decision heights. One may require GPS, another may not.
• Different minimums — landing minimums (visibility, altitude) typically improve as the suffix moves up the alphabet: Z usually has the lowest minimums, then Y, then X.
These distinctions let pilots pick the appropriate approach for their aircraft's capabilities and the current conditions.
|
Note: Countries outside the US sometimes use letter designations other than X/Y/Z. |
Troubleshooting
Reverting to an Older Version of FlightLog Analyzer
If a new version causes problems, you can roll back to a previous one. Visit the Change Log page on FlightLogAnalyzer.com and click the version number of any prior release to download and install it.
Reverting to a Logbook Backup
If something goes wrong after a Logbook Cleaner or Flight Fixer operation — for example, Flight Simulator starts with an empty logbook — use Edit → Restore FlightLog… and pick a recent restore point.
Built-In Map Display Not Showing Satellite Overlay Correctly
We're aware of this issue but don't yet have a permanent fix — it appears to be a Leaflet rendering quirk. The workaround: uncheck Satellite Overlay, then check it again. The missing tiles fill in correctly on the second pass.
Finding Your Logbook in a Non-Standard FS Installation
If FlightLog Analyzer starts but the main display is empty, your logbook wasn't at the expected default location. Use File → Logbook Locator for Non-Standard FS Installations.
The Locator asks for a starting directory and drills down from there, checking files one at a time. It can be slow, so pick the deepest known directory you can. For example, starting at
C:\ will check every file on your C: drive — that takes a while. If you know Flight Simulator is somewhere under C:\MyGames\Simulators, start there.
When the search completes, the located logbooks are presented for you to assign to the correct sim version. FlightLog Analyzer will remember the location for next time.
The Program Crashes at Startup
Most startup crashes trace back to corruption in the logbook file caused by a Flight Simulator crash during a flight. We can usually analyze the file and work around the corruption — send us your logbook and we'll dig in.
Automatically Send Logbook to Support
The simplest way: File → Send Logbook File to Support. You'll be asked a couple of brief questions, and the logbook is sent along with some diagnostic system info.
Manually Locating Your Logbook — Method 1
Open your temp directory (paste
%temp% into the File Explorer address bar). Find the file FlightLogAnalyzer - TraceLog.txt and open it. Look for a line beginning with +++++ — that's the path to your logbook.
Example trace entry:
+++++C:\users\Geno\AppData\Local\Packages\Microsoft.FlightSimulator_8wekyb3d8bbwe\SystemAppData\wgs\...
Manually Locating Your Logbook — Method 2
Steam installation
If you installed Flight Simulator into the default Steam location, the logbook is at: C:\Program Files (x86)\Steam\userdata\<steamuserid>\1250410\remote\kh_logbook
Microsoft Store installation
The logbook is stored under randomly named folders that change after every flight, so a quick search is needed:
1. Open C:\Users\<user>\AppData\Local\Packages\Microsoft.FlightSimulator_8wekyb3d8bbwe\SystemAppData\wgs in File Explorer.
2. This folder should contain exactly two subfolders: one named "t" and one with letters and numbers. If you see additional folders, they're from prior installations and can be ignored (or removed, after backing up).
3. Double-click the correct folder to enter it, then copy the path from the address bar.
4. Open Command Prompt (Win+R → CMD → Enter).
5. At the prompt, type CD followed by a space, then paste the path. Press Enter.
6. Run: findstr /s /m "LZMA" *.*
7. The search lists matching files. If multiple files are returned, the most recently dated one is your active logbook. Zip it (or upload as-is) and send to support.
LNM (Little Navmap) Export Notes
LNM may auto-record flights of its own.
If Little Navmap is open while you're flying, it automatically creates its own logbook entries. After importing your FlightLog Analyzer export, you may see duplicates. To distinguish them, look at the Travel Real Time, Aircraft Registration, or Simulator columns: FlightLog Analyzer exports leave those fields empty and set Simulator to "Microsoft Flight Simulator 2020", while LNM's automatic entries fill them in and set Simulator to "MSFS".
Three options for avoiding duplicates:
• Disable LNM's automatic logbook (Logbook menu → uncheck Create Logbook Entries).
• Manually delete the auto-recorded entries before importing (sort by Travel Real Time or Aircraft Registration).
• Clear LNM's logbook entirely before doing a full import.
Empty fields in LNM imports.
A few fields aren't present in the MSFS logbook, so they remain empty in the export:
• Departure and Destination airport names
• Travel and Destination Real Time
• Aircraft Registration
• Distance Plan (nm)
Imported flights have no flight plan or aircraft performance.
MSFS doesn't store the flight plan or aircraft performance file in its logbook either. If you saved them from MSFS, you can attach them manually in LNM by right-clicking a logbook entry and choosing Edit Logbook Entry → Attach File.
SimToolKitPro Exports
1. In SimToolKitPro, choose Flight Tools → Import → Bulk Import.
2. A large text box appears, pre-filled with an example row.
3. Open your FlightLog Analyzer export in Notepad. Copy its contents and paste into the SKTP text box.
4. Click Import.
|
Note: A known bug in SKTP suppresses the "success" message if your pasted content ends with a line break. The import still succeeds — you just won't see the confirmation. To get the confirmation, paste so the cursor ends at the last character of the last line, with no trailing newline. |
Check My Logbook in SKTP to see the imported flights.
Volanta Exports
1. Use the Volanta desktop application, not the web version.
2. In Volanta, go to Settings → Import/Export → Manual.
3. Select the Volanta CSV file you exported from FlightLog Analyzer.
4. Expand the Flights section.
5. Select the flights you want to import.
6. Click Start Import.
Sky Dolly Export and Import
Unlike the other export formats, Sky Dolly exports create a separate .gpx file per flight. When exporting, you'll be asked to choose (or create) a target directory; the resulting folder contains one .gpx per flight.
To import into Sky Dolly:
1. In Sky Dolly: File → Flight Import → GPX format.
2. Choose Import Directory to import all flights at once (note: all imported flights will share the same airplane label).
3. Select the directory containing your .gpx files.
4. Pick an Aircraft (it's just a label, doesn't affect recording/replay).
5. Leave Waypoints and Position at their defaults (<wpt> for waypoints, <trk> for position).
6. Leave Default Altitude and Default Speed as-is.
7. Uncheck "Convert Altitude from WGS84 to..."
After import, the flights appear at the end of Sky Dolly's logbook.
|
Note: Flight Simulator's logbook is just that — a logbook, not a full flight recording. Don't expect Sky Dolly playback to perfectly reproduce the flight; the track data in MSFS's logbook will only give a reasonable approximation. |
Missing SIDs, STARs, or Approach Information
If you create flights using a third-party planner (PMDG, Maddog, iniBuilds, etc.) rather than the default MSFS planner, this information may be missing from your flights. The reason: third-party planners don't store the flight plan in Flight Simulator's logbook, so there's nothing for FlightLog Analyzer to read.
Missing Airport Name, City, or State
If the main display is missing airport names, cities, or states, you can add them manually to the airports.csv file at C:\Program Files (x86)\FlightLog Analyzer\Data.
If you do this, please send your additions to Support@FlightLogAnalyzer.com so we can add them to the master list for everyone.
Viewing an Altitude Profile in Google Earth
The elevation profile shown on the Features page of our website isn't a FlightLog Analyzer feature directly — it's a Google Earth feature you can use on any exported flight. To see it:
1. Select the flight you want to profile.
2. Right-click it and choose Show Elevation Profile from the context menu.
|
Tip: Click and drag across the profile to highlight the corresponding section of the flight on the map above. |
Reinstating "Show Again" Dialogs
FlightLog Analyzer occasionally shows informational alert popups with a Show Again checkbox. Unchecking it hides that popup permanently — until you reset them. To reset all Show Again selections, use Edit → Reset All "Show Again" Selections.
Contact Information
Questions and suggestions can be sent to Support@FlightLogAnalyzer.com. Your input helps make this software better — we always enjoy hearing from you.
Registration / Licensing
• Your license agreement is for single-user use only.
• It is against the license agreement to perform logbook editing, exporting, or any other FlightLog Analyzer function as a paid service to others.
Thank You for Supporting FlightLog Analyzer
Thank you for supporting FlightLog Analyzer! We're grateful to be a part of your flying — helping you manage and analyze your logbook with ease and precision. The app was built with pilots and aviation enthusiasts in mind, and your feedback is what keeps it improving.
Whether you're a professional pilot or someone who simply loves aviation, we hope FlightLog Analyzer earns a permanent spot in your cockpit or on your desk.
Please don't hesitate to reach out — Support@FlightLogAnalyzer.com.
Safe travels, and thank you for flying with us.
— 2 Guys with a Keyboard